
How To Read a Tape Measure (even if you’re not good at math)

Have you ever wondered how to read a tape measure the right way? Is there some kind of tip or trick to measuring more accurately? Or if there’s an easier way to do it? Do you struggle with fractions and decimals?
Reading a tape measure (also called a measuring tape) is essential for all projects, from figuring out if that couch will fit in your place to building an actual whole house.
From my 9+ years of woodworking experience, I’ll share a simple breakdown of how to read a tape measure so you feel more confident on your journey to start a skilled trade.
If you don’t care about getting into a skilled trade but still want to learn how to read a tape measure, I promise this will benefit you too.

“I don’t know who needs to hear this but 3 inches and 5 ticks is not an actual measurement.” – quote from Reddit
How To read a tape measure without making mistakes
In this guide, I’ll show you simple and effective ways to read a tape measure accurately, even if you claim you’re not good at math. This is a beginner guide but I hope to hit something that all levels of trades experience can learn from.
Get ready to measure up in no time. But seriously. You’ll learn to read a tape measure confidently, even if numbers aren’t your jam.
If you’re in a skilled trade or considering getting in, you must develop this skill. It’s a non-negotiable. Build this skill using the steps below and over time, continue adding new skills to your tool belt. You’ll be doing something called “skill stacking” which will help you get into jobs and roles you never thought possible.
Reading a tape measure might sound very basic, but it’s really the foundation to becoming a trusted team member at any construction company.
First, you gotta be able to execute the instructions given. “Hey, grab some 2×4’s and cut 40 pieces at 16 3/4” lengths.”
Then you’ll move on one day to reading plans, and figuring out the cut list yourself. And then, as you progress, you’ll be able to start measuring out a job or project to create the plans yourself. And by then, maybe you’re on your way to owning your own business in one of the skilled trades.
What is a tape measure?
Before we get into the step-by-step, I’ll clarify what a tape measure is and what kind we’re talking about. If you’re not a beginner, feel free to skip over this section.
You’ve already seen the photos above. These are retractable tape measures commonly used in all kinds of skilled trades and construction professions. But also for plenty of DIY home uses.
There are many more types of tape measures used in different industries and made of different materials but in this article, we’re talking about the cased tape measure with a blade made of steel, stainless steel or fiberglass and a catch hook at the end.
Tape measures most commonly use the imperial system (feet, inches) of measurement in North America but some use both the imperial and metric (meters, centimetres and millimetres) system of measurement (what Canada and the majority of the world use). We’ll talk about the imperial measurement system because it’s most commonly used in construction in Canada and the US.
When the tape measure blade is stretched out, you’ll see tick marks, numbers, and various shapes. It can seem confusing at first but once we break it down, you’ll be able to interpret everything happening on the tape and feel confident measuring in no time. Including where to place the catch hook to measure accurately.
A tape measure is a versatile tool that helps you measure distances with precision, ensuring that your project turns out just the way you want. Whether you’re working on a DIY project, renovating your home, or pursuing a career in carpentry, learning how to read a tape measure is essential.
Quick Guide: How To Read a Tape Measure
Feet: Every 12 inches is one foot. These are marked with an arrow, triangle, or similar marking and are commonly abbreviated with for FT.
Inches: These are marked by the longest lines going across the blade and the largest numbers. 12 inches make up one foot. (break out your 12 times tables)
Half-Inch: Half-way between the inch marks and marked with the second longest lines on the blade. Two half-inch markings make up one inch.
Quarter-Inch: These are the third longest lines on the blade and are halfway in between the half-inch markings. Four quarter-inch markings make up one inch.
Reasons You Need to Know How to Read a Tape Measure
Precision: Accurate measurements are essential for ensuring that your project fits together perfectly. If you’re measurements are off, you’re very likely going to end up with pieces that won’t fit together.
Efficiency: Knowing how to read a tape measure saves you time by eliminating the need for guesswork or rework.
Professionalism: Whether you’re a DIY enthusiast or a professional tradesperson, the ability to read a tape measure accurately reflects your expertise and attention to detail. If you’re working on any kind of job site, you will need to know how to comfortably and accurately read a tape measure if you’re going to last and progress in your career.
Confidence: Learning how to read a tape measure correctly will not only improve the quality of your work but also boost your confidence in tackling new projects and ultimately help you get a solid start in a variety of skilled trades.
If I were teaching a young apprentice who has little to no experience with a tape measure, these are the step-by-step instructions I would use to help them read a tape measure like a seasoned carpenter.
Step-by-step instructions to read a tape measure
I’ll show you a unique process that focuses on simplifying the reading of a tape measure by breaking down measurements into easy-to-understand steps. I’ll emphasize visual cues and practical techniques that anyone can use.
By incorporating real-world examples, guides, and photos, I’ll make learning how to read a tape measure both educational and enjoyable. Whether you’re measuring for a small craft project or a large-scale renovation, this approach will give you the skills and confidence you need to get the job done right.
Here’s a step-by-step guide to help you master this essential skill:
- First Date with Your Tape: Get to know each other. Find out about the different parts of what makes your tape special. Explore the tape, housing, and hook.
- Use the Tape’s Hook: Either push the tape hook against the edge of an object or securely hook it onto the edge of the object you’re measuring.
- Acquainted with Whole Numbers: Identify the whole numbers on the tape measure, which represent inches or feet, depending on the unit of measurement.
- Visualize the Inch: Divide the inch into halves, quarters, and eighths to read fractions quickly.
- Identify Half and Quarter Marks: Look for longer marks indicating half and quarter inches.
- Counting Lines: Count the tick marks the proper way.
- Interpret Fractions: Look for the smaller markings between the whole numbers, which represent fractions of an inch or centimeter. Common fractions include 1/16, 1/8, 1/4, and 1/2.
- Add and Subtract Measurements: Use the tape measure to add or subtract measurements easily. To add measurements, align the zero mark on the tape measure with the starting point of the first measurement, then read the total measurement at the endpoint. For subtraction, follow the same process but subtract the second measurement from the first.
- Avoid Parallax Errors: Keep your eyes directly above the measurement for accurate readings.
- Double-Check Measurements: Measure the same object twice to ensure accuracy. The more you practice, the more comfortable and proficient you’ll become.
Now that you know the basic steps, let’s get into each one in more detail.
Step 1: First Date with Your Tape
Get to know your tape measure. The tape is the retractable pieces of aluminum or steel with all the lines and numbers on it. The housing is the body of the tape measure that houses the tape. The hook is the metal end of the tape. There is also a belt hook that allows you to hook the tape on your belt or your pants.

A quick safety consideration when you first start using a retractable tape. It’s spring loaded. Which means when you pull the tape out and let go, it’s going to wind back up into the housing quite quickly and can slam the tape hook into the housing. Or your hand if you’re not careful.
Work on bringing the tape in slowly applying some pressure with your hand to guide the tape back in.
Almost all tape housings will have the measurement of length of the tape recorded on the bottom or back of the tape. So you can measure a distance from the end of the tape hook to the back of the tape’s housing.
With this method, look at the measurement on your tape and add the length of the housing for your final measurement.
Step 2: Using the Tape’s Hook

Become the captain of your ship and use that hook the way God intended. The tape hook is an often misunderstood piece of the measuring experience. The hook moves people! It is supposed to have a little “play”, a little “wiggle room”.
Your tape is not broken. It was made to move.
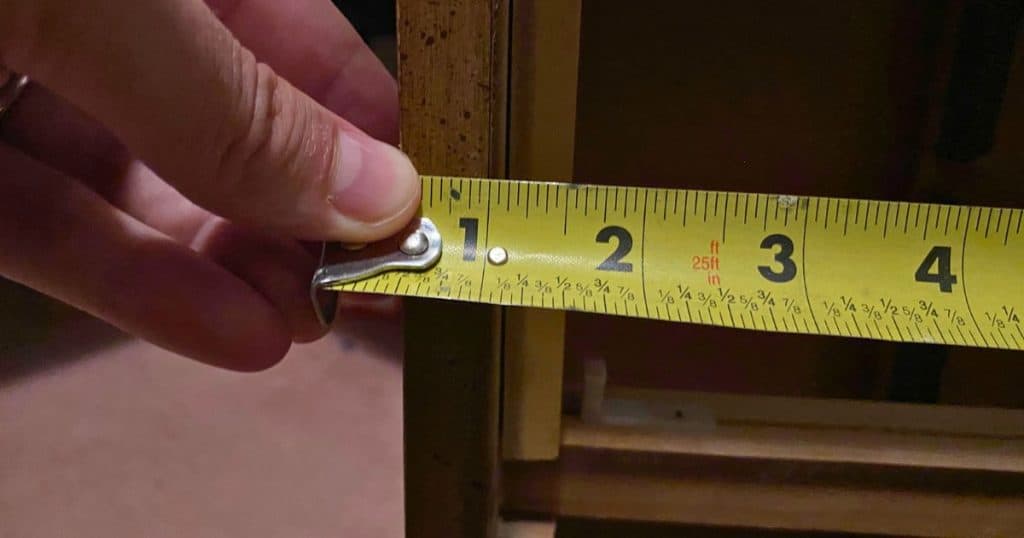
The reason your tape hook slides back and forth is to compensate for the thickness of the hook. When you hook onto the edge of material and pull the tape housing back, it gets pulled to its longest position.
Photo – Tape hooked on outside of material
When you extend the tape and push the outside of the tape hook against a surface to take a measurement, the hook is going to be in its shortest position.
Photo – Tape pushed against material
Here’s a video that shows exactly what this looks like in action…
Video??
Step 3: Acquainted with Whole Numbers
Identify the whole numbers on the tape measure. Those numbers beside the longest lines represent inches.
The other whole numbers represent feet. Twelve inches make up one foot.
Quick Tip: Guide to writing measurements
12 feet 3 inches = 12ft 3in = 12’ 3”
These three are the most common ways you’ll see measurements written.
Step 4: Visualize the Inch and break it down
I’ve seen so much advice online to use your hand or fingers or feet to estimate measurements. Now, if there are no tape measures to be seen and that’s really your only option, sure. But I’m going to strongly suggest you don’t rely on that.
Put your thumb in between two of the inch marks on a tape. Is that exactly an inch? Probably not. Over many inches, that measurement is going to end up way off.
Instead, do this.
Look at this diagram of an inch. Now count the marks. Notice there are 15 lines in between the inch marks making 16 equal spaces.
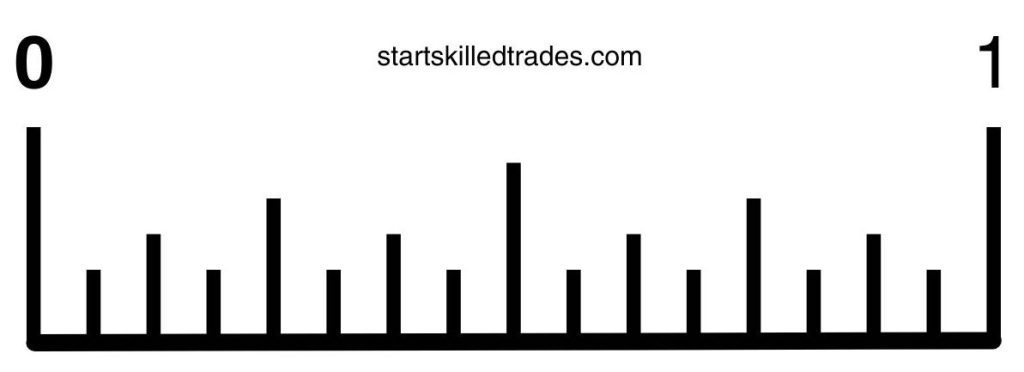
The second longest line goes right down the center or halfway. That’s the ½ inch mark. The third longest lines break each of the halves into two to form ¼’s. So those are the ¼ inch marks.

The next shorter lines go halfway in between each of the ¼ inch marks to make ⅛’s.

And often the shortest lines on most tape measures are in between the ⅛ marks called 1/16’s.
Some tapes have EVEN shorter lines wedged in between the 1/16th marks called 1/32’s. Most of the time the tape only has these marks on the first 12 inches of the tape or not at all. They’re generally used for fine woodworking uses where very detailed measurements are needed.
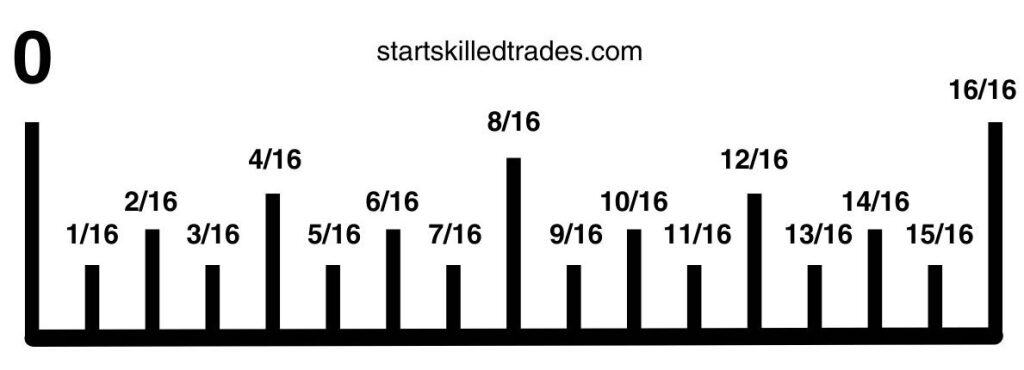
Here’s the whole inch shown with all the inch marks labelled. Next, I’ll show you how to quickly figure out how what your measure is without needing to refer to a diagram or counting all the tick marks.

A Warning: Why you should not use an EZ read tape
If you’re on a job site, you’re not going to want to be counting tick marks to figure out your measurements. And a tip from a lot of DIY folks I’ve seen mention EZ read tape measures that have your tape markings labelled. That’s strictly for the DIY audience who are building projects from home.
If you’re looking to build skills to get into a skilled trade, already an apprentice, working in a trade, you’re not going to want to rely on that kind of labelled tape measure. The reality is, you’ll likely get some ridicule but that’s not the worst thing.
You may forget your tape, or it breaks or gets lost, and you need to grab and use another one. Likely that tape is going to be a regular unlabelled tape that you’re going to have to read now with no markings labelled for you.
So feel free to print out a diagram and use it at home while you’re learning and practicing. If you need it on the job site, go for it to help you get by in the early days. But make sure you’re learning quickly so you don’t need to rely on that diagram.
Step 5: Simple Measurement Math – Breaking it down
Ok, so now what?
You know what the lines say but decided you won’t rely on a diagram to tell you the measurements.
Let’s start with the basics of fractions because every measurement is a fraction.
- Reduce Fractions (Measurements) to their simplest form
If the top number of a measurement (fraction) is an EVEN number, continue dividing it by 2 until it’s an odd number to get to the fraction’s simplest form.
When you divide the top number (called the numerator), you have to divide the bottom number (called the denominator) by the same number.
Every measurement on a tape is in the proper or simplest form of the fraction. You cannot have measurements like 2/8 or 8/16. These numerators (top numbers) are even numbers and we must divide them to break them down into their proper form.
Dividing by 2 always works because the tape measure’s bottom numbers (called the denominators) can always be divided by 2. (1/16, 1/8, 1/4, and 1/2)

Remember the top number needs to be an odd number for the measurement to be in its proper form. Either 1, 3, 5, 7, 9, 11, 13, or 15. This is so important!
- How to avoid counting all the tick marks
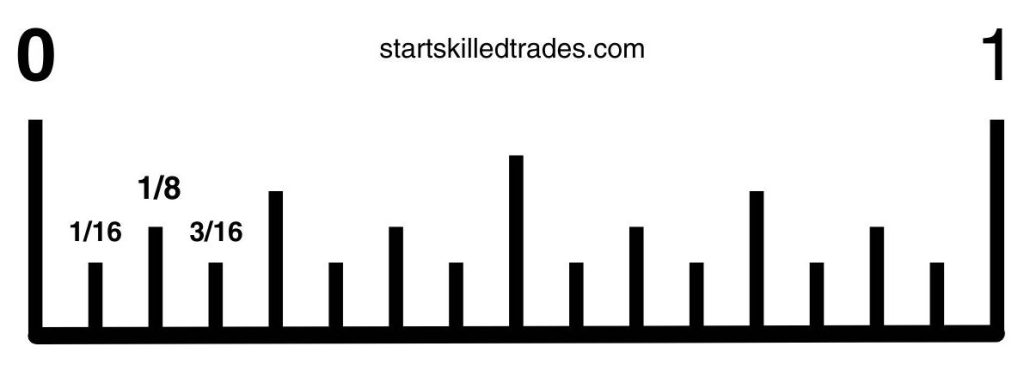
Let’s start with the 1st tick mark. The 1/16th mark. That’s easy to count and quick. We’ll be counting through the 1-inch section to break it down.

But what about 2/16? Is that the right measurement? Nope – you got it. We can’t have 2 as the numerator because it’s an even number so we have to break it down. So we divide by 2.
Now we get ⅛. Is that correct? Yes. Our top number is odd so we know we got it into the simplest and proper form.

Now you can count all the 1/16 inch, 1/8 inch, or 1/4 inch lines on the tape to get your measurement. That IS a way to avoid reducing fractions, but it simply takes longer.
So I’ll encourage those of you considering, entering, or already in a skilled trade to NOT rely on counting. By learning this method, you’ll see a measurement and know how to read it without needing to do any math in your head.
The math we’re going through now really is just to know WHY the measurements are recorded as they are and HOW they got to their simplest form.
The math is going to help you add and subtract measurements. But that’s for later on.
Remember: All fractions must be in their proper (simplest) form
1/1 = 1
2/16 = 1/8
4/16 = 1/4
6/16 = 3/8
8/16 = 1/2
10/16 = 5/8
12/16 = 3/4
14/16 = 7/8
16/16 = 1 inch
Let’s keep going.
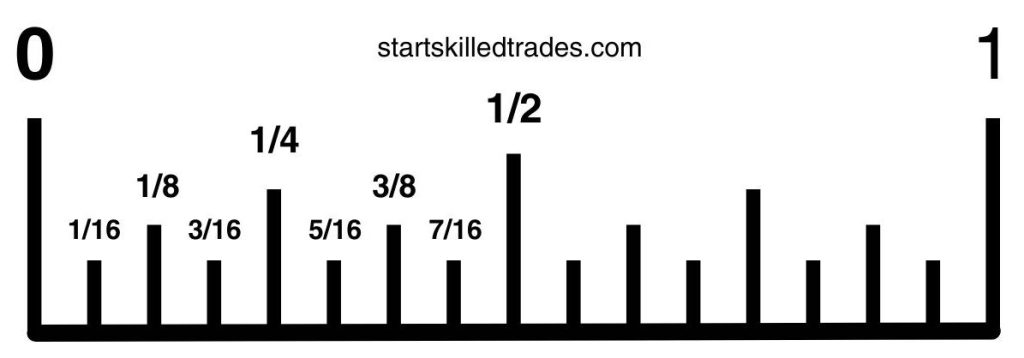
What about the 3/16 mark? Yep – you nailed it. That’s already in its proper form because 3, the numerator is an odd number.
Next, we have the 4/16 mark. Is that proper? Nope. I see an even 4 in that numerator spot. So let’s break it down by dividing by 2.
Now we get 2/8. Can we leave it there? Yeah, you’re getting this. We cannot. 2 is still an even number. So divide both the numerator and denominator by two again and we get 1/4.

Quick fraction tip: When dividing a number by itself, like 2/2 or 4/4 or 8/8 or 16/16, that always equals 1. Because 2 goes into itself 1 time. So the proper form of that fraction is a whole number, 1.
Next, we have the 5/16 mark. Yep – you nailed it again. That’s already in its proper form because 5, the numerator is an odd number.

Next, we have the 6/16 mark. Is that proper? No again. I see an even 6 in that numerator spot.
So we break it down by dividing by 2. Both 6 and 16 are divisible by 2 so we then get 3/8. And there we have it! Now in its proper form.

Next, we have the 7/16 mark. Yep – you nailed it again. That’s already in its proper form because 7, the numerator is an odd number.

Next, we have the 8/16 mark. Is that proper? No again. I see an even 8 in that numerator spot.
So we break it down by dividing by 2. Both 8 and 16 are divisible by 2 so we then get 4/8. But this time, we notice, hey the numerator of 4 is still an even number.
So now we’re getting to the measurements that if we start by dividing by 2, they will require dividing multiple times. OR the quicker method is to think of the highest even number both the numerator and denominator divide into equally.
We know 2 works but we’re trying to reduce it one time. So let’s go higher to the next even number. Does 4 work? Well, looks like it does! We get 2/4. But you’re catching on here and know that hey, this measurement still isn’t in its proper form. We gotta reduce.
So we’re back to 8/16 and think, hey let’s skip 6 because I easily know that doesn’t fit into 8.
Now we’re at dividing by 8 and well now it seems obvious. Of course, I can divide both of these numbers by 8.
You did it. We now have ½”.
Quick Tip: For measurements beyond ½”, start your reference point at the half-inch mark.
Ok what does this mean?
Counting beyond ½” means you’ll be trying to read measurements like:
9/16, 5/8, 11/16, 13/16, 7/8, or 15/16
So INSTEAD of counting all the tick marks up to a measurement like 9/16, you think hey I know that the half-inch mark is 8/16 so one more of the smallest tick has to be 9/16.

Or you’re looking at the 5/8 mark. You now know that 1/2 also is 4/8 so one more 1/8 mark is 5/8.

Step 6: Counting Lines (More like an alternative step that builds off of Step 5 – so read that first!)
If you desperately need to count the number of lines of a measurement – use this quicker method to avoid needing to reduce fractions all together
Look at the line on your tape measure that your measurement mark is hitting. Is it hitting the shortest line, 2nd shortest, third shortest, or longest?
Simply count how many lines from the beginning of the whole inch number.
You count every line of the same length or longer – but DO NOT count the lines that are shorter than the one your measurement is lining up with.
For example, if your measurement is hitting one of the shortest lines after the 8 inch mark, count how many lines come after the 8 to find out how many 16ths your measurement is. If you count out 7 lines total, your measurement is going to be 8 and 7/16 inches.
If you end up counting 8/16 or 10/16, you know that because the top number is even, you shouldn’t be counting the shortest line (1/6ths). Your measurement is lining up with one of the second or third shortest lines. Try again and count only that length of line or longer. Don’t count any lines that are shorter than your measurement mark.
Another shortcut is to remember that the ½ inch mark = 2 – ¼’s, 4 – ⅛’s, and 8 – 1/16’s. So if your measurement is past the half inch mark, you can have a head start in counting lines by starting halfway.
Step 7: Add and Subtract Measurements – Two Ways
On top of learning how to perform single measurements, you’ll need to learn how to add and subtract measurements too.
First Method:
The easiest way to add and subtract measurements on a tape measure is using a simple trick carpenters have used for a long time.
Say you have a measurement of 31 ½” and need to add 11 ⅛” to it.
- Locate the 31 ½” measurement on your tape
- Fold your tape in half
- Locate the 11 ⅛” mark and line it up with the 31 ½” mark

Now look at the end of your tape measure (outside edge of the tape hook) to see what measurement it lines up with
If you got 42 ⅝”, you nailed it!

Now the reverse. Let’s look at subtraction.
Let’s use the same measurements of 41” minus 5”.
- Locate the 41” measurement on your tape
- Fold your tape in half
- Locate the end of your tape measure (outside edge of the tape hook) and line it up with the 41” mark
- Now look at the 5” mark to see what measurement it lines up with on the other side of the tape
- If you got 36”, you nailed it!

To add and subtract if both your measurements are less than 18 inches, it is easier to use a separate ruler or second tape measure instead of folding your tape measure in half. You will have a tough time folding the tape to line up the shorter measurements. At some point it won’t be possible.
Second Method:
The second way to add measurements is going back to high school math fraction equations. But this first one is still more of a counting method. I’ll dive deeper into the math in the alternative method after.
You should already know about numerators and denominators from above. Now it’s time to add and subtract. Here’s one example to get you started.
Let’s add 4 3/16 in to 7 1/2 in.
- First, we add 4 + 7 and get 11 inches
- Next we add the 3/16 and 1/2
One of the quickest methods to add these two fractions is to find the 11” mark on your tape measure and then add the 1/2” from the 7 1/2″ measurement.
So you’re at 11 1/2″.
Next you count 3/16 from that point. You now have 11 11/16” for your total measurement.
Alternatively, you can do fraction math. This method will take a bit longer and is tougher for most people to do in their heads.
3/16 + 1/2 = ?/?
When adding fractions, you take the lowest denominator (bottom number) which is 2 in this case. And multiply it so that it is equal to the other denominator 16.
To go from 2 to 16, you multiply the 2 by 8.
2 x 8 = 16
And when you multiply the bottom, you must multiply the top number (numerator) by the same number.
1 x 8 = 8
So now you have 3/16 and 8/16. Now you can add them because they have the same denominator.
So now we have 11/16.
We already know from the previous method that 4 in + 7 in = 11 inches so we now have 11 11/16 as our final measurement.
To subtract, we do something similar. Let’s stick with the same measurements but subtract the larger from the smaller.
7 1/2 in – 4 3/16 in = ?/?
7 – 4 = 3 inches (easy peasy)
But what about 1/2 in minus 3/16?
Well, we first make the 1/2 have the same denominator as 3/16.
Again, multiply the 2 by 8 to get 16 and multiply the top number by 8 as well. We now have 8/16 and can subtract the two fractions since they both have the same denominator.
8/16 – 3/16 = 5/16
There you have it! Well done.
Step 8: Avoid Parallax Errors
Parallax errors simply mean that your eyes won’t be able to properly read a measurement if you’re looking at it from an angle. Keep your eyes directly in front of the measurement for accurate readings.
Ensure the tape measure is at eye level for an accurate reading.
A simple example from a different world is measuring ingredients for cooking or baking. Take a glass measuring cup and fill it with water up to the 1 cup mark. If you don’t ensure you’re looking at the 1 cup mark at eye level, your measurement is most likely going to be off.
Same goes for reading a tape measure. Say you have measure the height of a wall. You know that trying to read your tape measure markings way above your head is going to create a parallax error because of the angle you’re looking at the tape. So what else could you try?
Here’s one alternative method to avoid it.
You can measure from the floor to around your eye level, make a mark, and record the measurement. We’ll say 5’ 5”. Then measure from the ceiling to that mark (3’ 7”) and add up the two measurements.
5ft 5in + 3ft 7in = 9 ft
Step 9: Double-Check Measurements
A final and very important step. Measure twice to avoid errors. Errors are costly. You waste time and if you cut too short, you can waste valuable material. Maybe you only have so much molding and now you’ve cut your last piece too short. Uh oh.
That means a trip back to the supplier and that’s if they have it in stock. Plus you might be making additional work for the painter who needs to paint or stain a piece that is now already installed.
With double-checking comes practice. The more you practice, the more comfortable and proficient you’ll become. You’ll feel more confident, you’ll work smarter, and you’re going to be a more reliable team member.
Then you’ll be the one messing with the new apprentices, telling them to go find the “wood stretcher” when they cut something too short…
Key Considerations For Successfully Reading a Tape Measure
One thing I haven’t mentioned yet are the shape markings on the tape.
The most obvious ones are the big arrows that are right on top of the 12”, 24”, 36” measurements and so on. These mark your feet measurements. Every 12 inches will add up to an additional foot. Sometimes the tape will have a different colour line or an arrow to mark off each foot.
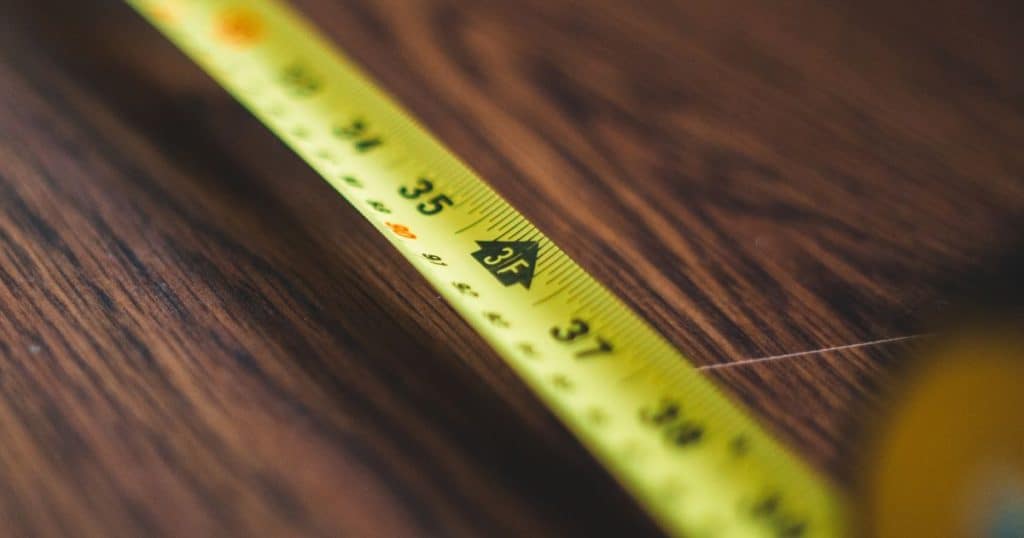
A more hidden one is the little diamond or triangle mark you’ll see every so often along the tape. These are every 19ft 3/16in and mark off the common distance between floor joists in home construction.

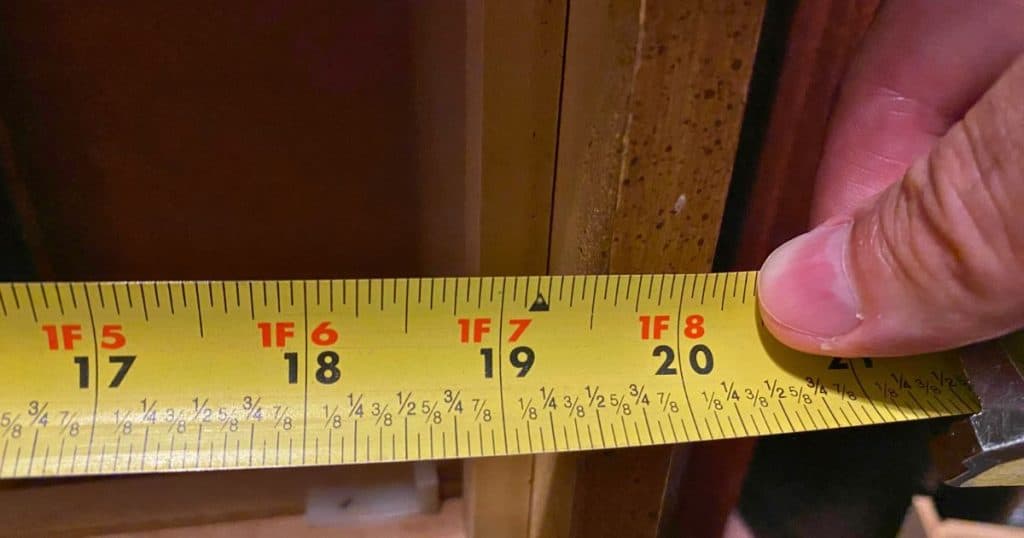
Every 16 inches, you’ll generally see a highlighted number with arrows. This marks the center point of studs in framing up walls of a house.
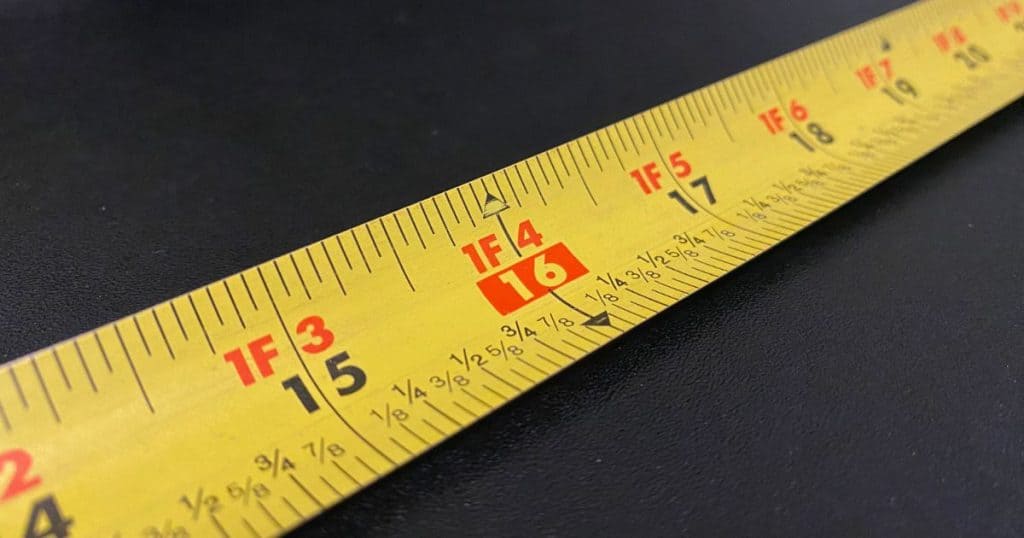
It’s important to know what these mean and how to use them, especially in residential construction. I’ve only ever used the 16” stud markings on a tape while doing finish carpentry in homes. But often to supplement, I would use a stud finder to ensure I was really getting a stud behind the drywall.
Taking it to the Next Level: How to read a tape measure like a pro
Carpenters, woodworkers, and contractors use their tape measures a lot. Let’s get you on your way to using it to its fullest potential. Or at least knowing how in case you need to use a lesser-known feature. You’ll feel even more confident on the job site.
- The tape hook can notch onto nail and screw heads. The space in between the two metal teeth of the hook is designed so you can fix the tape hook onto a screw or nail and measure from that spot.
- Draw a quick circle by notching the tape hook on a nail or screw. Place your screw in the centre of the circle and notch the tape hook on the screw. Pull your tape out to your desired radius (halfway across the circle or the diameter) and secure your pencil against the tape and the housing, touching down on your material. Then spin the tape around the screw, drawing your circle. Here’s a quick 2 minute video showing you how.
- Get a head start counting lines past the half inch mark. A key shortcut is to remember that the ½ inch mark = 2 – ¼’s, 4 – ⅛th’s, and 8 – 1/16th’s. So if your measurement is past the half inch mark, you can have a head start in counting lines by starting halfway.
- Secure the tape in an extended position without the tape lock. Something I learned from my dad was to press my pointer finger against the underside of the tape where it meets the housing to hold it in place. This is a quick lock to keep the tape from sliding back into the housing while you mark your measurement with your other hand.

- Get to know your tape’s “standout” limit. Standout simply means the length of tape you can have pulled out of the casing parallel to the ground before the tape “breaks” or bends from gravity. This is important to know for your tape so you can confidently measure distances while on a ladder or reaching across a span where you can’t stand.

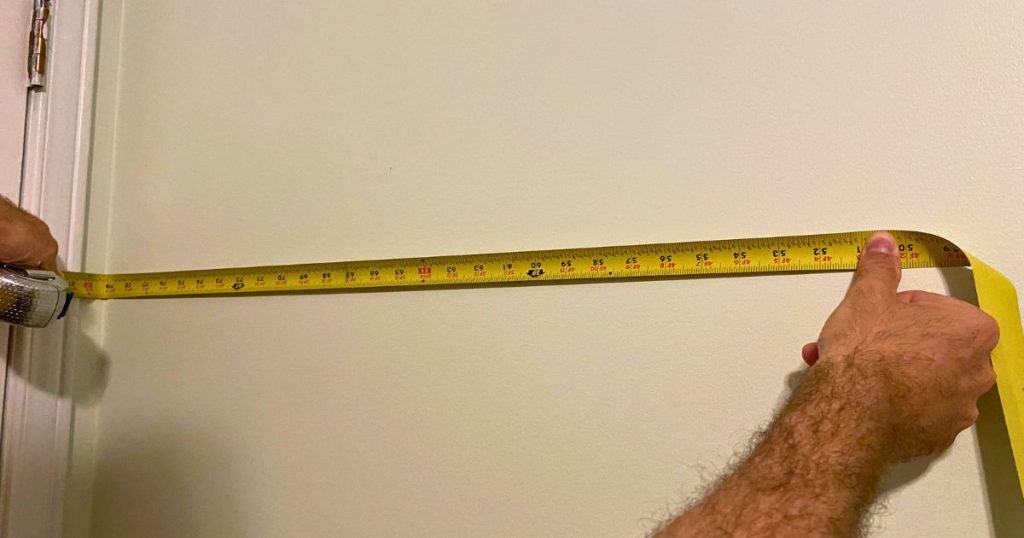
- How to measuring a wide wall span that “breaks” the tape. Sometimes you need to measure a long span of wall and your tape keeps “breaking”. One tip is to start your measurement pushing the hook against one wall.
Then keep pinning the tape against the wall as you pull out more and more tape to measure the entire span. You’ll need to press the tape hard against the wall so it doesn’t move too much. This is really only suitable for rough measurements.
And here are some more common use cases of a tape measure with simple instructions.
How to measure in between two walls
Note that the wall by the floor and the wall by the ceiling and everywhere in between can and usually do have different measurements. It’s a pain. I know. Walls are almost never completely straight because of either a bend in the 2×4’s while framing or other issues.
So measure the distance between the walls where you actually will install the moulding or whatever your purpose is.
- Bending the tape method
- Pull out the tape measure and butt the hook against one wall
- It’s easiest to let the tape run along the floor if nothing is in the way
- If you need to, the tape is designed to stay rigid and extended in the air for various lengths depending on the material and width of the blade
- Keep the tape pressed against the wall while extending the tape until you have more than enough to reach your other wall
- Bend the tape blade so that the fold or bend is against the corner of the wall you’re measuring
- This will give you a close measurement but it takes a lot of practice to get the measurement more accurate

I honestly used this method the most while installing moldings around staircases. It’s quick and generally accurate enough to get the measurement accurate on the first try. But it took practice. And there were times I would end up cutting a length of molding too short.
- Measuring from both sides to mark the middle method
- The more accurate (and slightly longer) method is to measure from one wall to somewhere in the middle – doesn’t matter where
- Make a mark and record the measurement
- Measure from the other wall to that mark
- Add up the two measurements to get your final one
Measure the inside distance of a cabinet
- Pull out more than enough tape for the length you need and hold the tape in place with your pointer finger pushing against the underside OR using the lock
- Push catch hook against one inside edge of the cabinet so only half the width of the hook is against the cabinet gable and the other half is in the open air

- With your hand that isn’t holding the tape measure casing, hold the blade of the tape to maintain the pressure of the catch hook against the cabinet wall using your free hand
- Bring the tape blade towards the other side of the cabinet until it’s touching the gable piece
- Now read the inside measurement of the cabinet
OR if you want to make sure you’re getting the most accurate measurement, you can do a very similar method but “burn an inch” at the start.
- Instead of pushing the catch hook against the inside of the cabinet, you will hold the 1 inch marking against the inside edge of the cabinet wall and then proceed with the same instructions as above.
- But you will need to add one inch to the final measurement because you’re starting at one inch (1”) instead of zero.
Wrapping Up and My Experience With Reading a Tape Measure
I used a tape measure almost every day of the week for 9+ years while working with my dad in his shop and on job sites. My encouragement, if you’re considering getting into the skilled trades, is to pick one up today and practice using it.
Especially if this is all brand new to you. Or if there was a lot in this article that you haven’t heard or done before.
If you’re looking for advice on what tape measure you should buy, I’ll give some suggestions on the FAQ section based on what type of work they’re more suited for.

